> ## Documentation Index
> Fetch the complete documentation index at: https://checkly-422f444a-playwright-vs-cypress-2026.mintlify.site/llms.txt
> Use this file to discover all available pages before exploring further.
# Integrating Checkly in Jenkins
> Run the Checkly CLI from a Jenkins pipeline, setting API credentials, choosing a reporter, and deploying checks as monitors after they pass against production.
We've optimized the [Checkly CLI](/cli/overview/) to work in any CI/CD workflow. Here are the basics you need to know that will come in handy when adapting the examples we give you to your own, specific setup.
1. For **authentication**, make sure to set the `CHECKLY_API_KEY` and `CHECKLY_ACCOUNT_ID` parameters as environment variables
in your CI/CD platform.
2. Set the **reporter** you want to use for the `test` command using the `--reporter` flag, i.e. `--reporter=dot`.
3. Use `npx checkly test` to validate your checks before deploying. Test results, traces, and videos are available in Checkly as a **test session**.
4. Use the `--force` flag on the `deploy` and / or `destroy` commands to skip the normal confirmation steps.
The CLI will attempt to parse `git` specific information from the environment to display in the test session as metadata.
You can also set these data items specifically by using environment variables.
| Item | Auto | Variable | Description |
| - | - | - | - |
| **Repository** | false | `repoUrl` in `checkly.config.ts` or `CHECKLY_REPO_URL` | The URL of your repo on GitHub, GitLab etc. |
| **Commit hash** | true | `CHECKLY_REPO_SHA` | The SHA of the commit. |
| **Branch** | true | `CHECKLY_REPO_BRANCH` | The branch name. |
| **Commit owner** | true | `CHECKLY_REPO_COMMIT_OWNER` | The committer's name or email. |
| **Commit message** | true | `CHECKLY_REPO_COMMIT_MESSAGE` | The commit message. |
| **Environment** | false | `CHECKLY_TEST_ENVIRONMENT` | The environment name, e.g. "staging" |
## A Basic pipeline example
Create a new Jenkinsfile in your repo, or add the steps and stages from the example below to your existing file.
This pipeline is "branch aware" and treats the `main` branch as the production branch. This means checks are only deployed
to Checkly after they are ran against production (after merging to `main`) and the checks passed.
## Configuring Jenkins to run the Checkly CLI
As the Checkly CLI is a Node.js project, the main step you need to take is install the NodeJS plugin.
1. In Jenkins, go to **Manage Jenkins → Plugins → Available plugins** and look for the NodeJS plugin and install it.
2. After installing the NodeJS plugin, we need to configure it. Head over to **Manage Jenkins → Tools** and click "Add NodeJS"
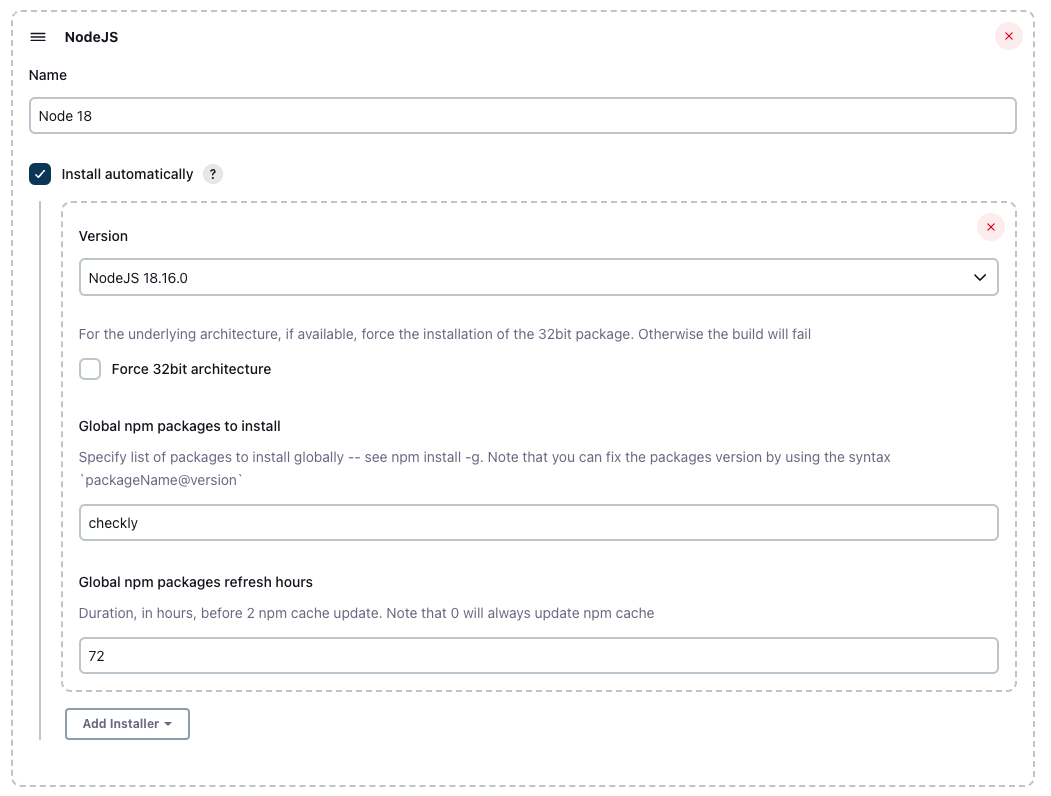 We recommend using any Node.js stable version higher than 16.x.
## Set your Checkly credentials
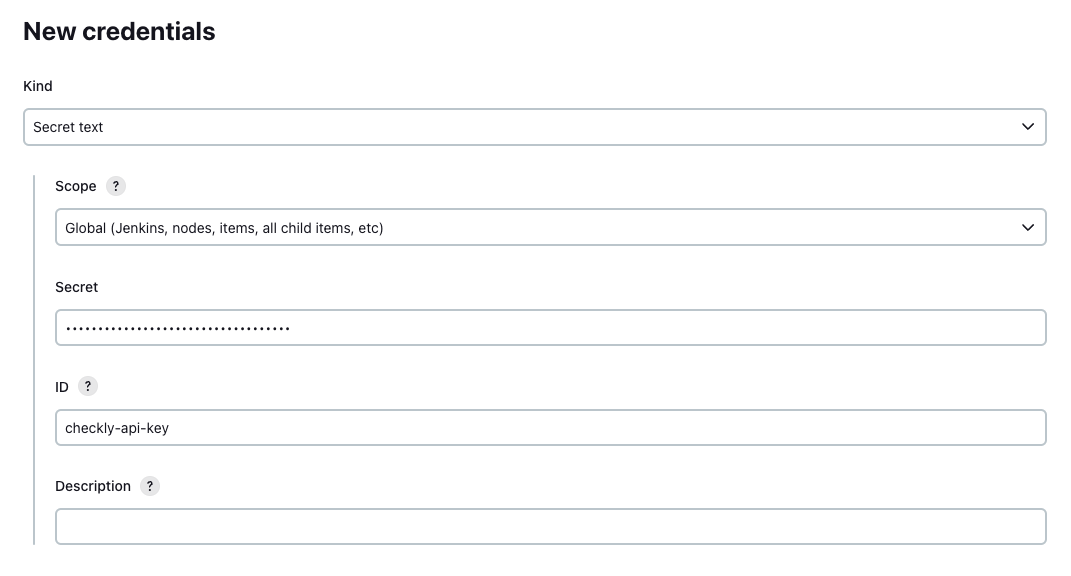
Navigate to **Manage Jenkins → Manage Credentials** to add your Checkly account ID and API key to your preferred scope.
Store them as "secret text" and assign and ID to the credential.
We recommend using any Node.js stable version higher than 16.x.
## Set your Checkly credentials
Navigate to **Manage Jenkins → Manage Credentials** to add your Checkly account ID and API key to your preferred scope.
Store them as "secret text" and assign and ID to the credential.
 ## Configuring the Jenkins Pipeline
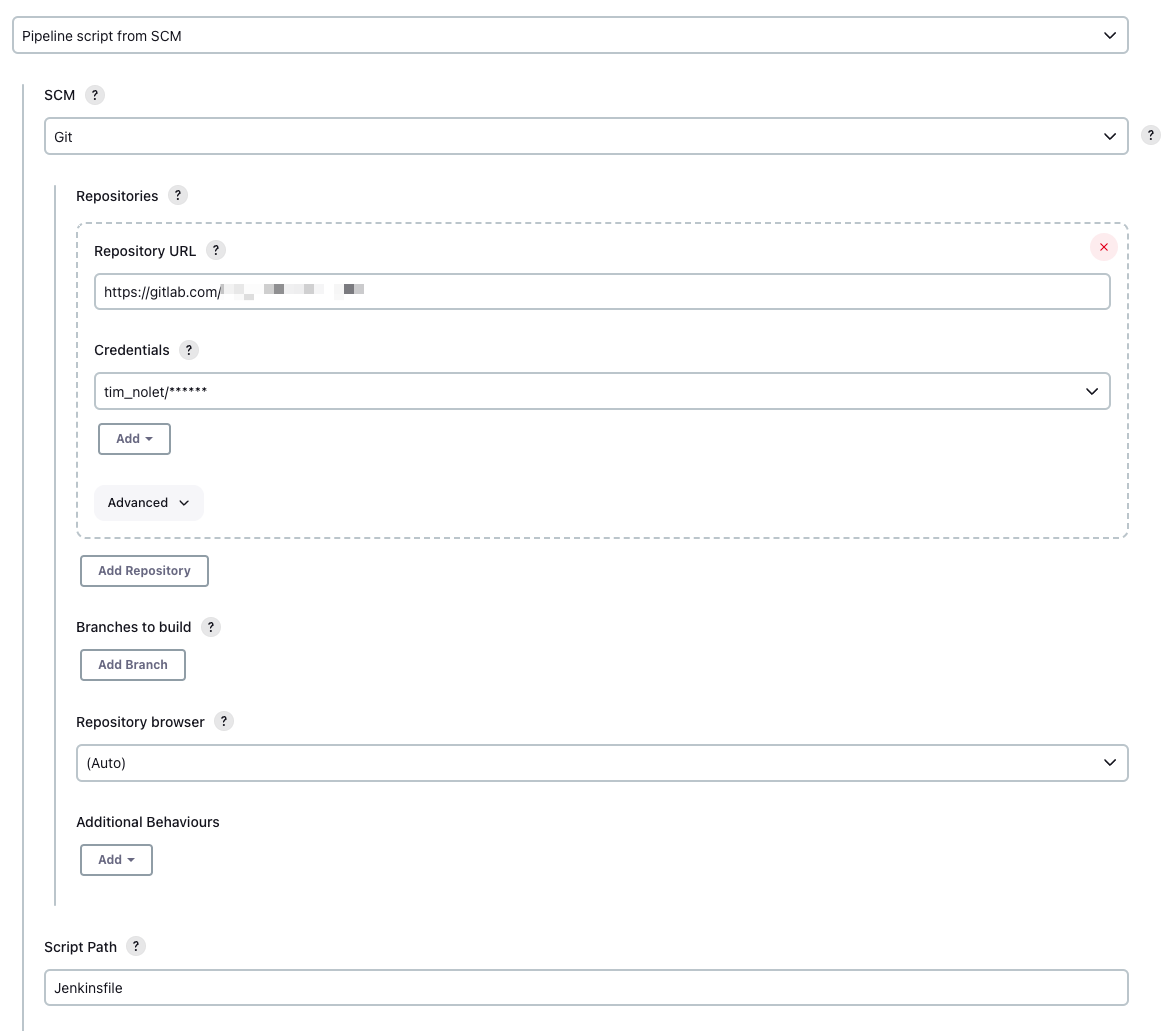
Add the `Jenkinsfile` to your repo that defines the basic stages and steps. Make sure to set up your SCM settings
correctly so Jenkins can fetch your git repo and look for the `Jenkinsfile` in the root of your project.
## Configuring the Jenkins Pipeline
Add the `Jenkinsfile` to your repo that defines the basic stages and steps. Make sure to set up your SCM settings
correctly so Jenkins can fetch your git repo and look for the `Jenkinsfile` in the root of your project.
 The actual contents of your `Jenkinsfile` will differ based on your code and how you deploy. But in general, your pipeline
should look as follows:
1. You deploy your application first.
2. You install the required dependencies for the Checkly CLI.
3. You run the `checkly test` command.
```groovy Jenkinsfile theme={null}
pipeline {
agent any
tools {nodejs "Node 20"}
environment {
CHECKLY_API_KEY = credentials('checkly-api-key')
CHECKLY_ACCOUNT_ID = credentials('checkly-account-id')
CHECKLY_TEST_ENVIRONMENT='production'
}
stages {
stage('Deploy') {
steps {
echo 'Deploying....'
}
}
stage('Dependencies') {
steps {
sh 'npm ci'
}
}
stage('checkly test') {
steps {
sh 'npx checkly test'
}
}
stage('checkly deploy') {
when {
branch "main"
}
steps {
sh 'npx checkly deploy --force'
}
}
}
}
```
The actual contents of your `Jenkinsfile` will differ based on your code and how you deploy. But in general, your pipeline
should look as follows:
1. You deploy your application first.
2. You install the required dependencies for the Checkly CLI.
3. You run the `checkly test` command.
```groovy Jenkinsfile theme={null}
pipeline {
agent any
tools {nodejs "Node 20"}
environment {
CHECKLY_API_KEY = credentials('checkly-api-key')
CHECKLY_ACCOUNT_ID = credentials('checkly-account-id')
CHECKLY_TEST_ENVIRONMENT='production'
}
stages {
stage('Deploy') {
steps {
echo 'Deploying....'
}
}
stage('Dependencies') {
steps {
sh 'npm ci'
}
}
stage('checkly test') {
steps {
sh 'npx checkly test'
}
}
stage('checkly deploy') {
when {
branch "main"
}
steps {
sh 'npx checkly deploy --force'
}
}
}
}
```